
So, you are all up with unit testing and your code has 100% coverage and 100% mutation test coverage, and you are all great.
However, when you’re working with microservices, you can easily have all your services appearing to work, but once you deploy them all to your staging environment and click a few buttons, you realise these services do not work together.
That’s where integration testing comes in.
Integration testing can come under the guise of behaviour-driven development (BDD), as it tackles a higher-level form of testing than unit tests. Generally, the tests are closer to the acceptance tests of the stories; things like, When a message is received from the x, the service should do something and send another message saying y to the z.
There are many ways to go about this form of testing, but I’m going to show one small example here. This is an example I gave for a workshop I’m doing, to spread the testing love around my workplace.
We are deploying our services more and more frequently as Docker containers, so our services are built and packaged as Docker images automatically by the continuous integration (CI) platform. For this post, I’m going to invent some simple services.
The one I invented is a really special service; it’s totally unique and awesome. When you send it a message on an ActiveMQ message queue, it sends another message on a different queue telling you what the message you sent it was. Great huh? Yeah, here we go the Echo Service again. Sure, it’s really basic, but it shows some of the mechanics of getting integration testing up and running without worrying too much about the service itself.
Our plan is to have our service deployed as a Docker container, so we’re actually going to test the functionality of that deployable image with an integration test.
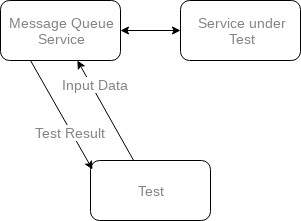
The acceptance criterion for our service says “When a map message arrives containing field message with value X on input-queue, the service outputs a message to output-queue saying Message was: X.”
Getting ActiveMQ Set Up
Ok, so let’s set up a docker-compose file to start up an ActiveMQ server and our service that we are testing. There are public ActiveMQ images we can use on DockerHub.
We start with:
version: '3'

services:
  activemq:
    image: webcenter/activemq:latest
    container_name: activemq
    ports:
      - "61616:61616"
This simple docker-compose file will start up the activemq:latest container, exposing the default ActiveMQ port on 61616. The name of the service activemq is mapped by docker-compose to a host name in the network that it generates, so we can use this in our services.
Getting our Service Up
Now let’s add our service that we’re testing to this set up:
service_under_test:
     image: service-under-test
     container_name: service_under_test
     depends_on:
       - activemq
     command: activemq
Here we stipulate that this service needs (depends_on) the activemq service to be started before being launched itself. This ensures that when our service starts up, it can connect directly to the activemq host in its network. (Note that docker-compose doesn’t wait until the application inside the container is running before it starts the second container, so it is still possible that ActiveMQ is not ready when our service starts. We would need to deal with that ourselves.)
One thing to note here is that the command appears to be activemq. This is down to how our service starts. The entry point of our service (in the Dockerfile that builds the image) is defined like so:
ENTRYPOINT ["java", "-jar", "target/service-under-test-1.0.0.jar"]
CMD ["localhost"]
This is saying that the command to run is: java -jar target/service-under-test-1.0.0.jar localhost; that is, localhost is the default host name of the ActiveMQ host.
This means that if we pass a different command, it will replace the default (localhost) and get appended to the ENTRYPOINT command. So, passing activemq as the command, we’re passing this host name into our service, and that’s the host name docker-compose set up for our other service.
If we run all this, we should end up with ActiveMQ and our service running happily side-by-side:
~$ docker-compose up
Starting activemq ... done
Starting service_under_test ... done
Attaching to activemq, service_under_test
activemq              | 2018-08-08 15:54:27,286 INFO success: activemq entered RUNNING state, process has stayed up for > than 1 seconds (startsecs)
service_under_test    | Waiting for messages on queue://input-queue...
Writing Tests
Right, now to test this. There are plenty of ways, but as we’re so good at unit tests, why not use something similar?
We’ll set up a new Maven project with only tests in it. These tests will connect to an ActiveMQ, send a message, and then wait for a response on another queue. We can use our favourite tools, like JUnit, AssertJ and all be happy.
ActiveMQ Rule
ActiveMQ is pretty easy to use (it’s based around the JMS standard), but connecting to queues and creating destinations all adds clutter to our code.
So, as we’re using Junit 4 still, we’ll create a @Rule to help with all that and make the tests readable.
Rather than copy and paste a great big file in here, you can go and look at it on GitLab. It means that at the top of our test we can put something like this:
public class IntegrationTest {
    @Rule public ActiveMQRule activeMQClient =
		new ActiveMQRule()
			.onHost(System.getenv("ACTIVEMQ_HOST"))
			.withOutputQueue("input-queue")
			.withInputQueue("output-queue");
This automatically connects to the ActiveMQ host (provided in our environment with ACTIVEMQ_HOST), and automatically creates and connects to the queues given, capturing messages on the input queue.
Integration Test
Once we have the rule setting up the connection with ActiveMQ, our tests are then nice and readable:
@Test
public void shouldReceiveMessageOnOutputQueueWhenMessageSentOnInputQueue() throws JMSException {
	ActiveMQMapMessage message = new ActiveMQMapMessage();
	message.setString("message", "Hello world!");

	activeMQClient.sendMessage(message).waitForMessage(500 );

	assertThat(activeMQClient.numberOfMessagesReceived() ).isEqualTo(1);
	assertThat(activeMQClient.getMessage(0) ).isInstanceOf(ActiveMQTextMessage.class );

	ActiveMQTextMessage textMessage = (ActiveMQTextMessage) activeMQClient.getMessage(0);
	assertThat( textMessage.getText() ).isEqualTo("Message was: Hello world!");
}
In given/when/then terms, this is:
- given we create and send a map message (on the output queue)
- when a message is received
- then there should be only one text message containing the expected text.
Of course, the test you write is specific to your service, but this is a black-box test of our service: we know it takes a map message as input and returns a text message.
If we want to run these tests locally, we can because the ActiveMQRule defaults to a localhost ActiveMQ if the environment variable is not there. If we need to set it, then we can like:
ACTIVEMQ_HOST=my.awesome.host mvn test
Running the Test in Docker
So we create a Dockerfile for our test, just like any other really:
FROM maven:3.5.4-jdk-8

COPY . /usr/src/myapp
WORKDIR /usr/src/myapp
CMD ["mvn", "test"]
It needs a maven image and simply runs maven test.
We can add this to the docker-compose.yml file, so that when we spin up the services in the docker-compose, it not only starts ActiveMQ and our service, but also the tests.
  test:
    image: integration-test
    container_name: integration_test
    depends_on:
      - service_under_test
      - activemq
    environment:
      ACTIVEMQ_HOST: activemq
    volumes:
      - /home/dd/docker_output:/usr/src/myapp/target
You can see that this service depends on both the other services, obviously; we are setting the environment variable ACTIVEMQ_HOST, so that we use the host name activemq for the ActiveMQ server; and we are also mapping the output from the tests into our host so that we can look at the reports afterwards.
If you spin up this docker-compose, you’ll find that it will run the tests and then just sit there. This isn’t ideal if we want to run our integration tests on a CI server, for example.
However, we can get around that by passing docker-compose the flag --abort-on-container-exit. When one of the containers stops, docker-compose will stop all the other containers too.
~$ docker-compose up --abort-on-container-exit
...
integration_test      | [INFO] ------------------------------------------------------------------------
integration_test      | [INFO] BUILD SUCCESS
integration_test      | [INFO] ------------------------------------------------------------------------
integration_test      | [INFO] Total time: 28.371 s
integration_test      | [INFO] Finished at: 2018-08-08T15:42:20Z
integration_test      | [INFO] ------------------------------------------------------------------------
integration_test exited with code 0
Aborting on container exit...
Stopping service_under_test   ... done
Stopping activemq             ... done
Summary
Awesome! We now have a nice integration test that we can run on our CI services every time we push our service, for example. We can be more confident that the service does what it is supposed to.
And I hope you can see how you could build this out, to support integration testing of multiple services; for providing complete end-to-end tests of an entire system.
There are some follow ups that need to be made to this post; for example, want to test how services behave when other services go down, or test the exact data that’s being transferred between services, or mock one of the services because it’s not dockerised or is too slow. I will cover these in later posts.
I hope this is a useful post; please let me know in the comments below.
If you want to play with the code yourself, go clone the repositories for the integration test, our silly service or the docker-compose file:
There are READMEs in each of those projects that should help you get it all running.
Comments: